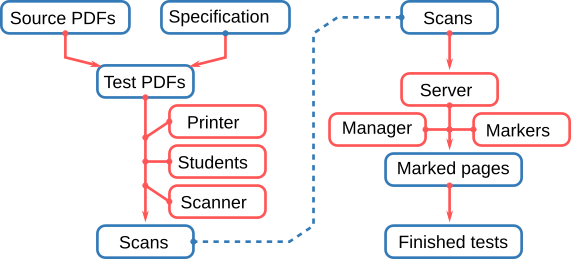
Workflow overview
We can break down the workflow into 4 stages
- Before you print
- After students write, but before marking starts
- During marking
- After marking is complete.
Before you print – Building
In order for Plom to function properly it needs to understand the structure of your test. Further, Plom was designed to handle multiple versions of tests suitable for crowded rooms or multiple sittings, it needs to understand how you wish to combine different test versions. To specify all of this we need to make a specification.
The plom-create command will produce a template specification for you to edit. You need to tell the system
- how many versions of the test, how many pages and how many questions
- which pages belong to which question, and how to choose them from the source versions
- how many marks each question is worth
- how many papers to produce
Once your specification has been constructed and verified, you need to copy the test source PDFs into place. Another run of plom-create will then construct the test PDFs and start populating the database with information. The PDFs are all stamped with unique qr-codes that the system will later use to identify scanned pages. Consequently you must print one PDF for each student. You cannot reuse PDFs.
Before marking starts – Scanning
By this stage your students have sat the test and you have scanned the physical papers and have a stack of PDFs to deal with. In order to process those PDFs and get them into the Plom system, you need to get the server running.
The plom-server command will help you configure the server and get it up and running. You’ll also need to build a few “default” users at this point:
- manager – the instructor who will oversee the entire process and has access to all files and processes.
- scanner – this user is authorised to upload page images to the server. This is separated from the manager, so that this task can be delegated to a trustworthy colleague.
- you should also take the opportunity to make a couple of standard users who will run
plom-client. Plom can also make you a ready-to-go list of randomly generated users and passwords that you can assign to your markers as you need to.
To get PDFs processed and into the system, the “scanner” runs plom-scan. This first splits the given PDF into separate page-images and does a small amount of post-processing. Then plom-scan reads the qr-codes from the page images and uploads the identified pages to the server. If the qr-codes cannot be read then the “scanner” can upload those unknowns and the “manager” can use a different tool to identify them by hand. Extra pages (ie when a student has requested additional paper) are the most common causes of “unknowns”.
Marking
Once the server is up and running, and you’ve uploaded some page-images, your markers can get to work and you can manage the marking process. Note that you can start this before all papers are uploaded.
The majority of your TAs will need to download the Plom Client. We currently support
- Linux
- macOS
- Windows 10.
TAs can also install from source or using pip. We are also looking into porting the client to Android and iOS, but that is not a current priority. If you happen to have expertise in porting pyqt applications please contact us – we’d love to have you aboard.
Once your markers have their client and you’ve told them the location of the server they can log in and start working. The client (currently) handles 3 tasks:
- identifying – plom needs to know which paper was written by which student. The client will display the ID-pages of tests to the marker who can then enter the student’s name or ID. Some of this identification can be done automagically by Plom, but those are still verified by a human. Typically this is very quick and can be done near the end of the marking process.
- marking – you will typically assign a given marker to a particular question. If you have multiple versions of your test, then you should assign to a particular version of a particular question. The client will then only show that marker that assigned question/version. The client allows the marker to annotate the pages with simple objects like lines, arrows, boxes as well as text (including LaTeX) and delta-marks (such as +1,+2, -1). The client also remembers text comments so that the marker can quickly construct a set of standard comments (with associated delta-marks) to speed up marking and improve the quality and consistency of feedback to students.
- totalling – only relevant if you mark the physical papers and use Plom just to return them to students electronically. This is not a common use case.
The manager (ie the instructor in charge of the test) can run the plom-manager client. This gives the manager an overview of progress on different questions/versions as well as simple statistics such as histograms and typical time-taken-mark. The manager can also examine progress and histograms by marker. Finally, the manager can flag papers for later review.
After marking – Finishing
After the marking is complete, the papers need to be reassembled and a table of results compiled. We have scripts that do these steps, but we will soon combine them into a plom-finishing script. That script will help the manager to verify that all papers are marked and identified so that any “mopping up” can be done quickly. plom-finishing will then construct a spreadsheet of results and reassembled papers from the annotated page-images. These papers are then filed by student-ID.
In order to return papers to students (depending on your LMS) these papers can either
- be uploaded into the LMS – but you will need assistance from your local LMS-wranglers to work out how to do this, or
- be returned via a simple (and auto-generated) webpage.
In this second case Plom will assign each of your students a short random code-number. This should be kept private and only you and the student should have access to those numbers. Plom can then rename the reassembled papers by student-ID and student-Code. The (auto-generated) test return website then asks students to give then ID and code, and returns their PDF.
In order to get results and code to your students you’ll have to upload a spreadsheet to your LMS The spreadsheet generated by Plom should contain everything you need, but you will have to massage it into a form that will be accepted by your LMS. LMSs are like unhappy families - every one is unhappy in its own way. There is no way that the Plom team can build a system that will satisfy every one (sorry).